Using Decorative Stitches for Construction
by Rebecca Kemp Brent
Modern sewing machines are packed with decorative stitches that tend to be under-utilized. Put a new spin on your machine's fancy stitches by using them for construction tasks. The stitches are both functional and fun, and can add a couture touch to your sewing.
- Rather than an ordinary satin-length zigzag, use a decorative stitch to attach appliqués. You may have stitches that resemble fur to use for teddy-bear appliqués, or select a decorative satin motif. Center the appliqué edge under the stitch for best coverage, but remember that appliqués which are fused in place are fairly stable, and may not need to have their entire edge encased with thread. Blanket stitch and other openwork motif stitches can also be used for appliqué.
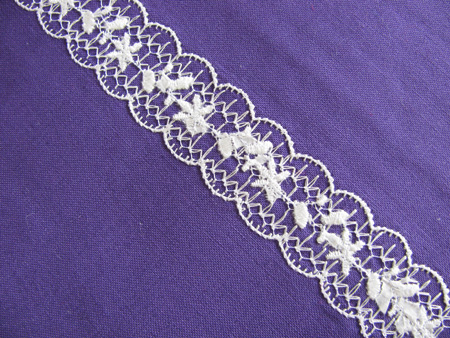
- Use a decorative stitch to attach ribbon or trim. Position the stitch so it overlaps the edge of the ribbon for a finish that stays flat through wearing and washing, or sew a decorative stitch down the middle of a flat trim to give it more pizzazz.
- Turn a blanket stitch around so only the "legs" of the stitch span the garment edge and use the stitch in place of edgestitching around collars, cuffs, etc.
- Substitute a decorative stitch pattern for straight topstitching.
- Choose an appliqué stitch – like a blanket stitch, but with three small stitches between short "legs" – to attach patch pockets invisibly. If the appliqué stitch is not available on your machine, experiment with a blind-hem stitch or blanket stitch instead. The appliqué stitch can also be used to finish collar bands and cuffs invisibly; rather than slipstitching the pressed edge over the seam allowances on the garment interior, sew the band facing to the garment wrong side first and fold the band to the outside, then use the appliqué stitch to secure it over the seam allowances from the garment right side.
- For reinforcement at pocket openings, slits, etc., use the button-attaching stitch. Leave the regular presser foot on the machine and sew the button stitch as a bartack across the seam being reinforced.
- Go beyond function by using a decorative satin-stitch motif as the reinforcement for pockets or slits. The reinforcing stitches can also be embellished further with decorative stitch patterns.
- Use a patchwork or bridging stitch to create single-layer, reversible patchwork. Apply 1/4"-wide fusible web tape to the edge of one patch on the fabric right side. Using the tape as a guide, overlap the edge with a second piece of fabric, keeping the overlap consistent at 1/4". Fuse the fabrics together. Sew along the seam with a 7.0 mm-wide stitch, spanning the overlapped area and finishing the raw edges on both sides.
- The patchwork technique can also be used to hem and finish an edge by positioning the stitch to cover the raw edge of the hem allowance.
- Attach hook-and-loop fasteners in a three-step process for a more polished appearance. First, edgestitch the fastener in place with a straight stitch. Second, sew a decorative stitch around the fastener's edges. Third, finish the application with a row of satin zigzag stitches that covers the fastener raw edges and one edge of the decorative stitch. For a simpler application, skip the decorative stitch and just finish the fastener edges with a satin-length zigzag (0.2 – 0.4 mm stitch length).
Contact information for publication with guide sheet:
Rebecca Kemp Brent
http://rkbrent.com
rebecca@rkbrent.com
Picture It Wall Hanging
by Rebecca Kemp Brent
Finished size: 15" x 17"
Materials
5/8 yard of 45"-wide lavender cotton for borders and binding
1 fat quarter of green cotton for embroidery background
1 fat quarter of blue cotton for backing
1/8 yd of 45"-wide yellow cotton for trim
18" x 20" quilt batting (choose a firm, needlepunched batting)
Embroidery and sewing threads
Spray starch
(optional) Bias tape maker (1/2")
Cutting
From the border and binding fabric, cut:
1 rectangle, 18" x 20"
2 strips, 2 1/4" x width of fabric
From the background fabric, cut:
1 rectangle, 12" x 14"
From the backing fabric, cut:
1 rectangle, 18" x 20"
From the trim fabric, cut:
1 strip, 1" x width of fabric
Construction
1. Press the background fabric rectangle with spray starch. Repeat two or three times to create a stiffened surface.
TIP: Stabilize a piece of scrap fabric, too, and use it to try out stitch combinations before committing them to the project.
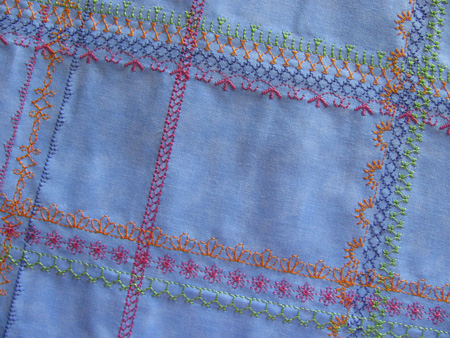
2. Using the photograph as a guide, draw a group of six intersecting lines for the largest figure. The lines are spaced 60° apart.
3. Set the sewing machine for a program of satin stitches. Vary the stitch length and width as well as the pattern shape and length to produce an interesting sequence of stitches. Thread the machine with embroidery or all-purpose thread and wind the bobbin with all-purpose thread that matches either the needle thread or background fabric color.
4. Beginning at the intersection of the guidelines, sew one sequence repeat of the satin stitch pattern along one leg of the guidelines. Tie off the stitches at beginning and end. Return to the center point of the guidelines and repeat to stitch along each of the six lines. Refresh the spray starch as needed during stitching.
5. Reset the machine for a different, slightly shorter sequence of satin stitches. Beginning at the center of the figure, sew one sequence repeat of the new stitch pattern between each previous leg of the design. You can draw guidelines for these new rows of stitches, or judge their placement by eye.
6. Set the machine for a third stitch pattern, shorter than the other two. Sew one sequence of stitches between each pair of legs in the design.
BEGIN BOX
Our sample uses these stitch sequences for the largest (orange) motif:
- For the first set of legs, sewn on the guidelines, set the machine for a single diamond with pattern length 5 (where the range is 1-5); two ovals, pattern length 2; and a single diamond, pattern length 2.
- For the second set of legs, sewn halfway between the first, set the machine for a single diamond with pattern length 5 and two ovals, pattern length 2. You can also simply delete the final diamond from the first stitch pattern.
- For the final set of legs, sewn between the existing lines of stitches and beginning away from the center point, set the machine for a diamond with pattern length 3 and a dart point with pattern length 1.
- The entire pattern uses a stitch width of 7.0 mm and stitch length of 0.8 mm.
END BOX
7. Mark and stitch other wheels of stitches to fill the background fabric. Remember that the fabric edges will be trimmed and bound, so place the primary stitching at least 1 1/2" away from the edges. Vary the sizes of the wheels, the stitch patterns, and the number of legs in a wheel as desired. Change threads for each motif, or even use multiple colors in a single wheel. It's also okay if stitches run all the way to the fabric edge; just remember that part of the stitching will be trimmed or covered.
8. Trim the stitched background fabric to 8 1/2" x 10 1/2", framing the best part of the stitched design.
9. Using chalk or a removable fabric marker, draw a series of diagonal lines 1" apart on the rectangle of border fabric. Draw a second set of lines, 1" apart, perpendicular to the first set.
10. Lay the border fabric right side up on the batting. Use pins or basting spray to hold the layers together.
11. Set the machine for a straight stitch 3.0 mm long. Thread the needle with a variegated or multicolor thread that coordinates with the border fabric, and wind the bobbin with all-purpose thread that matches the fabric color. Beginning at one edge on a line near the center of the rectangle, sew along the line.
12. Using the interior opening or edge of the presser foot as a guide, sew a second line of stitches near the first. Repeat to add a third line of stitching on the other side of the first line.
13. Move to the next drawn line and sew directly on the line.
14. Continue stitching across the fabric, alternating one and three rows of stitches at each drawn line. Exact spacing is not essential, and irregularities will add interest to the project. When all the lines drawn in one direction are complete, repeat the process to sew along the perpendicular lines.
15. Draw guidelines 4 3/4" from each edge of the border fabric, creating a rectangle at the center where the lines intersect. Position the trimmed background rectangle inside the guidelines and pin.
16. Remove the selvages from the 1"-wide strip of trim. With the wrong side up, cut the right-hand end at a 45° angle and press 1/4" to the wrong side along the cut edge. Press 1/4" to the wrong side along each long edge to create a 1/2"-wide strip. (Optional: Use a 1/2" bias-tape maker to simplify the pressing process.)
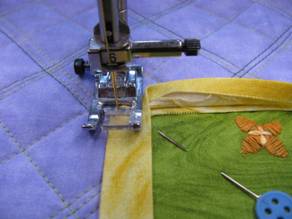
17. Beginning with the trim's pressed, angled edge at the one corner of the background rectangle, pin and edgestitch the outer edge of the trim to the border fabric through all layers, using a thread color that matches the trim. The trim's outer edge should lie just beyond the raw edge of the background rectangle. At each corner, stop with the needle down, fold the excess trim out of the way, pivot, and continue sewing along the next side.
18. Stop sewing about 3" from the corner where you started and cut the trim at an angle to match the beginning edge, allowing a 1/4" overlap. Open out the trim, press 1/4" to the wrong side, and refold the trim. Finish sewing its outer edge to the project. The pressed, angled edges will meet to form a miter at the corner; trim and tuck in the raw edges as necessary.
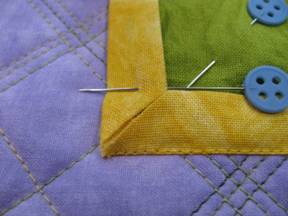
19. Fold the trim to form miters at the other three corners of the background rectangle and pin.
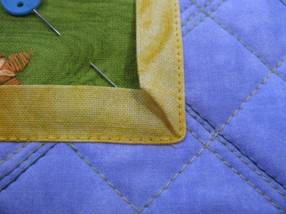
Set the machine for a decorative stitch and sew around the outer edge of the trim again. Use a thread color that blends with the trim and position the stitch so its inner edge follows the edgestitching on the trim.
20. Place the project on the backing rectangle, wrong sides together, and pin or baste. Edgestitch the inner edge of the trim to the project through all layers, covering the raw edges of the embroidered background rectangle and quilting the layers to the backing. Slipstitch the miters by hand.
21. Trim the project to 15" x 17", keeping the embroidered background rectangle centered.
22. Remove the selvages and sew the two binding strips together to make one long strip. Press in half, lengthwise, with wrong sides together. Bind the project edges, using a 1/4" seam allowance.
Contact information for publication with project:
Rebecca Kemp Brent
http://rkbrent.com
rebecca@rkbrent.com
Sewing Machine Featured in this Segment:
Innov-is VM6200D Dreamweaver XE
 |