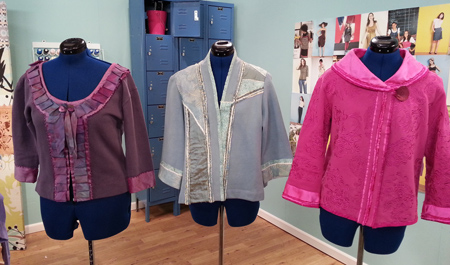
Stylish art-to-wear jackets can be created on the fabric base of a sweatshirt and NOT look like a sloppy sweatshirt when you follow either of these techniques developed by Londa and taught in her books as shown below and her jacket Talking Patterns™.

Sweatshirt Transformations by Londa Rohlfing published by C&T Publishing $27.95- click HERE

Creative Sweatshirt Jackets...Londa's Way Book 2 published by Londa Rohlfing $22.95 - click HERE.
Select and Prepare the Sweatshirt
LOTS of experience guides Londa to recommend a top quality sweatshirt of 80% cotton and 20% polyester over all others...from MUCH experience! She has found the USA Comfort Color offers these properties in many attractive colors and offers them HERE.
1. WASH the sweatshirt - to be safe, and specifically to remove any excess dye.
2. Cut off all ribbings and the extra layer often found inside the center back neck by cutting on the sweatshirt side of the ribbing. SAVE the lower ribbing as it has lots of creative potential!
Londa's Fitting Method #1
The sleeve to body seam REMAINS in the dropped position with this technique, but the 'sloppiness' of the sweatshirt armhole is drastically reduced. Some fullness will remain under the arm due to the seam location as in any dropped shoulder garment. A shoulder pad improves the silhouette.
Select a sweatshirt just big enough to go around your largest part.
1. If there are no side seams, press sweatshirt in half to establish side seams. Match these side seam locations to establish center back and center front. Slash along center front pressed line. Hand baste center back and side seam pressed lines.
For sweatshirt WITH side seams, still locate and baste mark the center back seam by matching side seams at the hem and shoulder seams at the neckline.
2. With sweatshirt on...
- Design desired neckline at front. (ie: V-neckline, cardigan style neckline, etc.)
- Determine how much sleeve seam to remove t underarm, through the sleeve, and through the body - mark with pins on ONE side (left side if you are riht-handed).
- Establish finished sleeve and body lengths.
- Mark bust apex locations with safety pins.
3. With sweatshirt flat on a table, smooth out and mark desired shaping according to marks through body and sleeve on the side pinned for one continuous sleeve through body seam line. At he of sleeve, and for 7" up, have the width equal to allow for a turn back cuff if desired.
4. Stitch with a stitch length longer than normal to accommodate the sweatshirt thickness.
5. Rotary cut off excess, leaving a 3/8" seam allowance. SAVE what you cut off to use in next step.
6. FLIP the cut off portion over and pin to the other side as a 'pattern' or template to cut the identical amount off. Take a 3/8" seam as done on the first side. Garment is now taken in the same amount on both sides.
7. CLIP seam allowance in underarm area of seam. Finish seam with serging or wide 3 step zigzag, pulling it straight to expand the clipped area.
8. Install shoulder pad for an improved silhouette.
Londa's Fitting Method #2
The sleeve to body seam is lifted up to its natural position at the top of the shoulder giving a smooth fit without any underarm fullness.
Purchase a 2XL (3XL if needed) sweatshirt for the most available 'fabric'.
1. Totally cut the sweatshirt apart: sleeves out and open; front separate from back at shoulder and side seams.
2. Fold fronts and backs lengthwise at 'centers', right sides OUT to enable seeing the 'grain' of the knit, and considering straight grain more important than matching the edges. They will NOT match!
3. Cut front and back pattern pieces using a pattern of your own that fits, or Londa's pattern as found in her books and sweatshirt jacket patterns, or online at this link in PDF format.
http://www.londasfiles.com/patterns/casualjacketpattern/html/howto.shtml
Cut the fronts and back as long as possible with available fabric.
4. Cut sleeves from sweatshirt sleeve fabric. IN all likelihood, there will not be sufficient length of sweatshirt fabric. Just cut as long as possible, and add fabric to achieve desired sleeve length in a creative manner.
Stay & Stabilize Regardless of Fitting Method Utilized
1. Using longest stitch length, stay stitch the back neckline of the jacket. Pull up the thread to insure that the neckline hugs the neck during a fitting. Knot to secure. Steam shrink out any fullness.
2. Apply Straight Fusible Stay Tape (or straight grain cut 1/2" wide strips of a woven fusible interfacing) along front edges. Determine which side of the jacket to apply stay tape to according to embellishment technique so that the tape is completely concealed. Londa's books and patterns include specific instruction.
3. Stay hemlines with Knit Fusible Stay Tape (or knit fusible interfacing in 1/2" strips) on inside, in hem allowance so that any twin needle or cover hem stitching will go through the stayed portion to prevent wobbly hemlines.
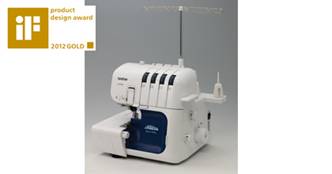
Sewing Machine Featured in this Segment:
5234 PRW Project Runway Limited Edition Serger
|