Supplies:
- Knit Fabric: 1 yard (jersey/interlock; cotton/poly blend is great; small amount of spandex is good, but avoid rayon; 4 way stretch; excellent drape and recovery; something with small stripes 1/4-1/2” work best; Girl Charlee online is a great knit fabric resource; prewash and dry)
- Lining: 1 yard (100% polyester, or a rayon blend is fine; something with a slinky, soft hand and drape)
- Thread: 100% polyester, fine, to match the knit fabric; may need an additional color to match elastic for waistband
- Elastic: 1 yard, or enough to wrap around your waist; 1-3 inches wide. (If you plan to sew your own waistband, omit the elastic).
- Sewing machine needles: ballpoint and double/twin
- Tracing paper, tape, pencil
- Flexible tape measure
- Rotary cutter and mat
- Straight edge acrylic ruler
- Stay Tape and Hem Template
- Pins
- Iron
- Sewing machine (with recommended walking foot)
Pattern:
- Draft a pencil skirt pattern. (Excellent tutorial: http://www.crafterhoursblog.com/2013/05/knit-pencil-skirt-tutorial.html). This will give you a very custom fit, taking into account a larger back piece for the more curvy part of your body.
- Or, trace an existing skirt in your closet onto your tracing paper. Add ½” seam allowance on all sides.
- You will need the entire front and back piece of the patterns, (not just half the pattern placed on a fold).
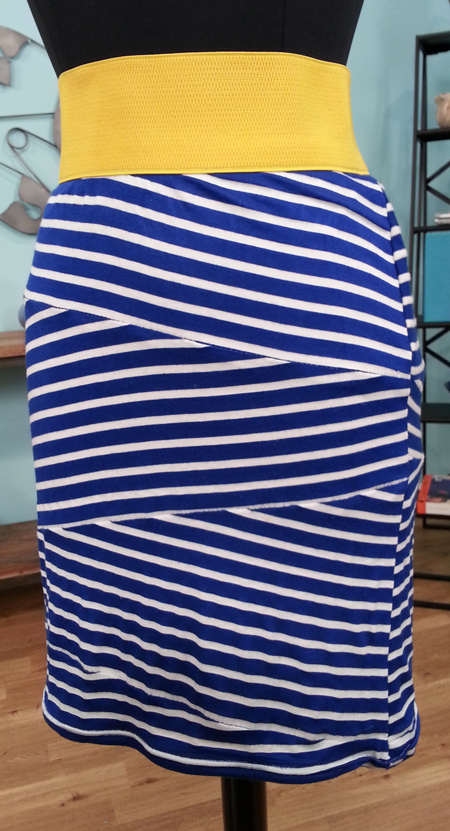
- Decide where you want the bandage panels to lie on the skirt pattern, and mark them on the left and right sides of both front and back pieces. Using a ruler, connect the lines. Be sure they match up on the front and back skirt pieces.
- Invert the bottom sides of the skirt if desired, by trimming slightly.
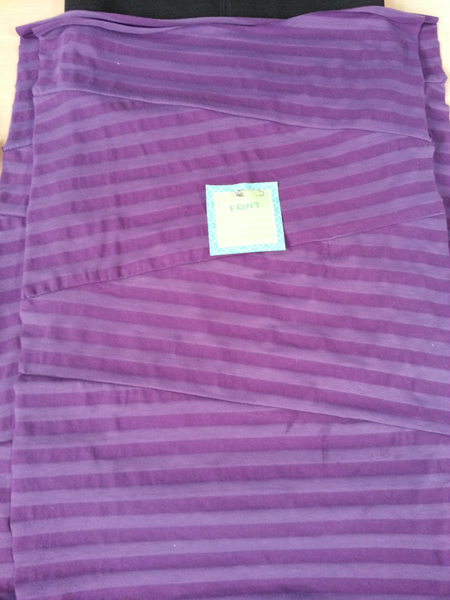
- Once the panels are drawn, there should be 4 sections. Label them all with a number, and write ‘front’ or ‘back’ on each piece. Then cut them all apart.
- Decide if you will be doing an elastic waistband or a yoga style waistband.
- Waistband measurement: Refer to step #15 in the above mentioned tutorial. It will basically be a rectangle, 13” x the measurement of your waist + 1” for the seam allowance.
Pinning and Cutting:
- Place the bandage panels on the fabric, making sure the greatest amount of stretch will go across your body. Then turn the pattern pieces so the bottom edge of each piece lines up with a stripe in the fabric. (By slanting the pattern pieces, we're not totally sticking to all the rules of stretch and grain, but that’s ok)! Be sure to leave at least 1 inch of space between each piece to account for seam allowances. (Do this only at the top and bottom, but not sides, since you already included seam allowances there).
- Pin the pattern pieces down. It may be easiest to cut with a rotary cutter, mat, and ruler. Add ½” for the seam allowance, by using the ruler. Do this on every single edge.
- Once things are all cut out, place them together to see what your skirt will look like. Then remove the pattern pieces.
Sewing with Knit Tips:
- Why use polyester thread? It has a controlled stretch, so it can stretch with your knit fabric and give a little in the seams. A cotton thread should not be used because it has no stretch. A fine or lightweight thread is ideal for jersey, interlock, and other knits. It takes less space in each stitch, which means less puckering in the seam. A fine 100% polyester thread is stronger than a cotton thread of the same size.
- Why use a ballpoint needle? It has a rounded tip that separates and pushes through the yarns instead of piercing them. A size 11 (75) or size 12 (80) is ideal.
- For this skirt, use a slight zig zag stitch (width set at 1), which will give stretch and ease to the knit as it moves with you. Use a ½” seam allowance unless otherwise noted.
- For the hem, use a double needle and stay tape. This will give a professional look to the skirt, and also gives stretch, which is needed as the skirt stretches as you walk in it.
- You don’t need to edge finish any raw edges, as knit doesn’t fray. You will likely need to edge finish your lining fabric though.
Sewing:
- Now its time to sew the bandage panels together. Remember to use a ballpoint needle, a slight zig zag stitch, and a ½” seam allowance. You don't need to edge finish the raw edges. Pin and sew right sides together for each panel. After sewing the seams together, you can trim with pinking shears if you’d like.
- Once the panels are all sewn together on the front and back skirt pieces, then sew up the side seams. Place them right sides together. Try to get all the panel seams to match up. Use lots of pins. Again, use a slight zig zag stitch and sew a ½” seam allowance.
- You may want to line the skirt since there are so many inside seams. Simply cut 2 pieces of lining, the same width as the front and back skirt pieces, and 1 inch shorter. If your fabric frays, edge finish the top and sides of each piece (an overlock, zig zag stitch, or serger work well). Hem the bottom by folding it over twice 1/4 inch, sewing with a zig zag stitch.
- Baste the lining piece to the skirt by placing the right sides of each piece facing outward. Baste the two pieces together at the top edge of the lining and skirt pieces, with a ¼” seam allowance. Now the lining and skirt are considered one piece.
- Now sew either a waistband or elastic to the top edge of your skirt.
- For the waistband, place the short sides right sides together, and sew. Press seam allowance open. Fold it over wrong sides together, so the 13” sides now equal 6” and forms a tube. The raw edges are now all facing the same way, with the fold on the opposite side. Pin the waistband to the skirt. Be sure the right sides are facing each other, and that all 3 raw edges are facing up. The waistband seam should be lined up to the center back skirt piece. When pinning, be sure to ease it around equally, taking into account that the back skirt piece may be bigger than the front skirt piece. Sew with a ½” seam allowance, a slight zig zag stitch.
- For the elastic, measure around your waist. Make sure it’s snug but not too tight. Then cut it to your size, and then sew it right sides together. Open the seam, and zig zag stitch down each side to keep the raw edges from fraying. Use a thread to match the elastic. I sewed the right side of my skirt to the wrong side of the elastic. Make sure it overlaps enough to cover the basting stitches. Sew, using a slight zig zag stitch, and stretch the elastic by pulling it slightly as you go around.
- The last step is the hem! Try on your skirt to find your desired length. Trim if necessary, (but leave 1 extra inch for the seam allowance). Turn skirt inside out, and press the bottom up 1 inch, wrong sides together. Use your hem template, which is a thick piece of paper cut at 1” to be your guide. Then insert the stay tape into the seam and press. Turn skirt right side out and topstitch using a 5/8” seam allowance. Use a double needle or the slight zig zag stitch.
For more information visit (www.familyeverafterblog.com)
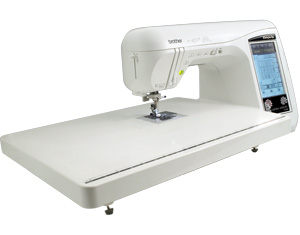
Sewing Machine Featured in this Segment:
Brother Innov-ís NX2000 Laura Ashley® Limited Edition Sewing Machine
|