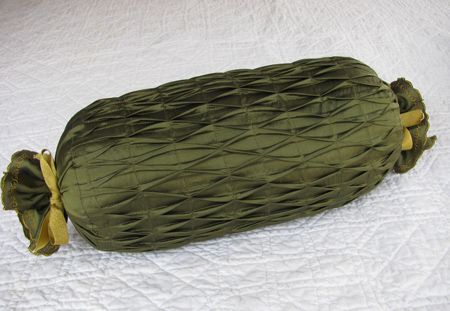
Tucked Bolster
by Rebecca Kemp Brent
Finished size: 14" x 6" excluding ruffle
Materials
5/8 yard of 54"-wide silk dupioni or medium-weight linen
1 yard of ribbon
4 buttons, 3/4" diameter
Seam sealant
Coats Machine Embroidery thread
Coats Dual Duty XP All Purpose
14" x 6" cylindrical pillow form (Note: Measure your pillow form before you begin. If it is actually longer than 14", you may need to cut the large rectangle wider and re-space the lines of stitching in Step 7.)
Instructions
1. Cut a 13 1/2" x 44" rectangle for the tucked panel and a 7" x 44" rectangle for the end panels.
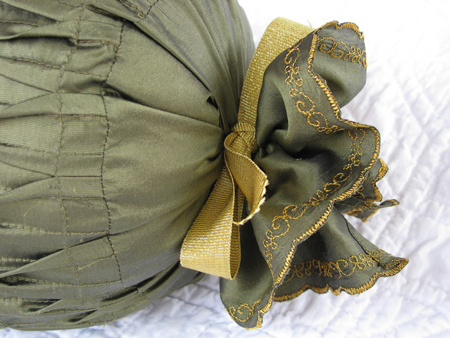
2. Use spray starch to stiffen about 3" along one long edge of the 7" rectangle. Create a decorative edging with satin-stitched scallops and other decorative stitches, using Machine Embroidery thread in both needle and bobbin. Position the scallops 1/2" – 3/4" away from the fabric edge.
3. Apply a seam sealant to the wrong side of the scallops and trim away the excess fabric. Trim the strip to measure 5 1/2" wide and cut into two 22" pieces.
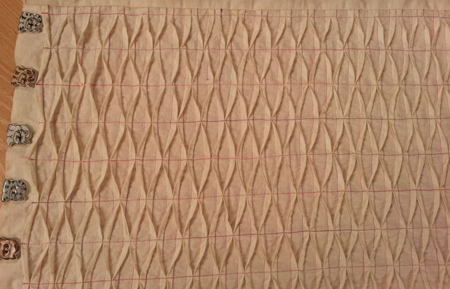
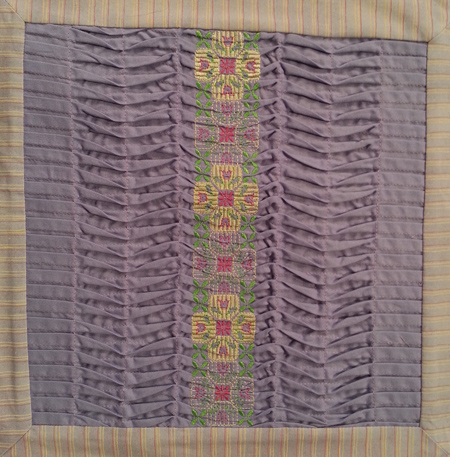
4. Park the 13 1/2" rectangle at 1" intervals along each long edge, starting and ending 2 1/2" from the ends.
5. Fold one end to meet the first pair of pencil marks and press. Fold the fabric at the marks and stitch a 1/4" tuck, catching the raw edge in the tuck. Repeat at the other end.
6. Continue to fold and stitch 1/4" tucks at each pair of marks until the entire piece of fabric is tucked. Do not press the tucks.
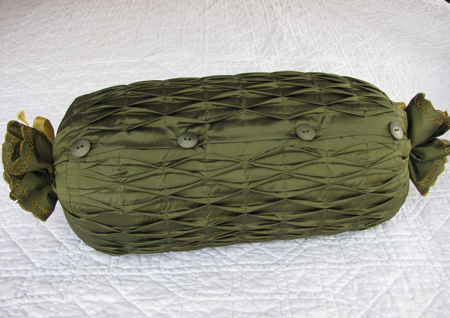
7. Mark nine lines parallel to the raw edges with chalk, drawing the lines over the tucks. Make the first and last lines 3/4" from the raw edges and space the remaining lines 1 1/2" apart.
8. Stitch on each line, folding the tucks in alternating directions as you sew. For example: On the first line, turn the first tuck toward you, the second tuck away, the third tuck toward you, etc. On the second line, turn the first tuck away, the second tuck toward you, the third tuck away, etc. Backstitch at the beginning and end of each line of stitches, and don't sew across the hems. Continue until all the marked lines have been stitched.
9. With right sides together, sew one decorated 5 1/2" x 22" strip to each raw edge of the tucked panel with a 1/4" seam allowance. Match the panel centers and stretch the tucked material gently to fit; the ends of the decorated strips will extend about 1/2" beyond the hemmed ends of the tucked panel. Overcast or serge the seam to finish the raw edges. Narrowly hem the ends of the decorated strips, making them equal in length with the tucked panel.
10. Make four buttonholes on one hemmed end of the tucked panel. Sew buttons to the corresponding locations on the other hemmed end.
11. Cut the ribbon into two pieces. Button the cover around the pillow form and use the ribbon to gather and tie the ends of the cover. Compress the pillow form as you tie the ends to give the bolster a plump finished appearance.
Tips
- Use spray starch to stiffen the fabric for tucking and decorative stitches. If desired, fuse a layer of lightweight interfacing to the wrong side of the large rectangle before marking and stitching, or use a heat-away stabilizer for non-washable fabrics.
- Silk dupioni is washable, and you can use spray starch to stiffen it for stitching. When the decorative stitching is complete, add seam sealant as directed, then soak the fabric thoroughly in lukewarm water to remove the starch. Wrap the fabric in a towel and squeeze to remove excess moisture; press with a warm iron until dry and smooth.
- If your fabric ravels, overcast or serge the raw edges before working with the fabric pieces.
- If you can't find a bolster pillow form, purchase a craft-size quilt batting; fold it to measure 14" wide and roll it tightly to fit inside the pillow cover.
For more information visit www.rkbrent.com
Sewing Machine Featured in this Segment:
Brother Innov-is 40e Project Runway Limited Edition Sewing Machine

|